Video How-To: Let's make an elegant french twist using Betty Pins
Posted on September 01 2020

How many times have you wanted to put your hair up in a pretty french twist but thought, it will just fall out in an hour and I'll have to take it all down! If you spend as much time making your hairstyles look gorg as we do, then you should make sure the style will last as long as you want it to. Fortunately, this is exactly why we invented Betty Pins! Let's dive in and show you how easy it is:
Video Tutorial on How To Make a French Twist using Betty Pins:
And for those of you who like to read through each step as you try it, here is the written step-by-step with pics at each key stage:
First: get your hair in a lower ponytail, and it is ok to leave it a little messy, it doesn't have to be perfect.

Next, twist and as your twisting, pull up gently.

Keep twisting the hair all the way up the ponytail as you hold it up. Thicker hair will be a little more challenging to hold in place than thinner hair. (one of the few times us thinner hair ladies get an advantage!)

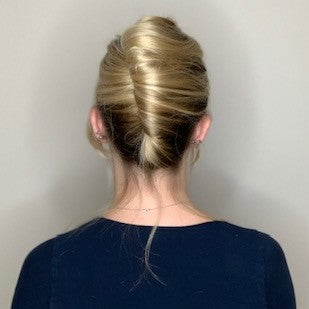
After you get the twist all the way to the top, you bring the ends down along the inside of the twist and tuck them in. Loosen up the twist a bit as you tuck the end in to make sure it is nice and hidden.


If done correctly you shouldn't see any of the tail outside of the twist.

Next, secure the twist at the top using a Bobby Pin along the base of the twist where it meets the scalp. (Remember wavy side down with the toe opening face down for better hold!) If you have a model with thicker hair, you may need 2 Bobby Pins.

Next, we are going to use our Betty Pins, in this case, the Betty Pin Dancer style with one bent leg and the other a straight leg. You want to use the straight leg to grab a little section you want to hold at the center of the twist groove. The insertion method is: push in, push down along the scalp, and them push in again until the pin is all the way so the fish hook end can find hair in the inside of the twist to hold onto.

You want to continue placing Betty Pins in along the groove until you have good coverage the entire length of the twist. This will help define a nice straight line that the twist will maintain until you take the pins out.


Once your Betty Pins are in, you can make small adjustments to the shape of the groove line, and you can also fix the bottom of the twist if needed by opening or closing the Betty Pins to maintain the shape you want.

The end result is a super classy french twist that will last all day, and keep looking fabulous even through moderate levels of activity.


We hope you like this tutorial and will come back soon to see what we have next to show you.
Thanks to our model: Teagan!
As always, Live it Up! And Keep it Up!
We only get through the toughest times together.